Pages

Tuesday, October 30, 2012

A Fun Tote for A Cute Little God Daughter

After finishing yesterday's skirt, I was ready for a fun, quick project.  My cousin and god daughter brought over this little tote bag and asked me to reattach the glued on ribbon.  My little god daughter (she's 3!) said that she also wanted her initial and some "sparklies." 

Embroidery Machine to the Rescue!!!
I found the "Sparklies" in my stash of trims and other junk I have been holding onto for just the right project.  I think that my very fashion forward God Daughter will look spectacular carrying this bag to school!  :-D

Very grateful that we didn't have any damage or even lose power and praying for those who were not so fortunate... 

Despite the wind and rain - or actually because of it - I had a great time playing with fabrics this weekend! 

Back to work tomorrow!  

Monday, October 29, 2012

The Pencil Skirt the Hurricane Blew In...

So what's a girl to do when Mother Nature give you a hurricane day home from school? 
She heads straight to the sewing machine while she still has power and sews up that skirt she's been meaning to make since last winter!


Plaid Pencil Skirt
Back view - I'm pretty happy with the
plaid matching.

I found this fabric at G-Street on the $3.99 table when I was visiting the store for the class where I made this blouse.  I knew that it was going to become an easy, pull-on skirt, but got side-tracked by several other projects...and then it was spring...


At first I tried to draft my own pattern using a skirt that fits me.  It seemed like it should be easy, but low confidence in my pattern drafting ability and the fact that I'm still getting into the swing of sewing for myself after all these years made it a frustrating experience.


After multiple tries with a muslin, I realized that I really needed to use a pattern for a base.  Digging through my pattern stash I found an old 1988 pattern that may have even been my mother-in-law's.
It was just 3 pieces and the size 18 fit straight out of the package.  (Pattern sizes are nothing like ready-to-wear.  You wear 2-3 sizes smaller in ready-to-wear.  I've heard a lot of reasons why, but it is still shocking to say that I have to cut a size 18!!!)


The waist is 2 1/2 elastic and I added the lining


The only changes that I made to the pattern were:

  • Left out the belt loops 
  • Added a wider elastic waist instead of the 2 pieces of narrow elastic called for
  • Added a lining. 
  • Fringed the bottom hem instead of a traditional hem 


The lining is some tricot lining that I found in my stash.  


I sewed a tiny zigzag for the hem and then pulled
out the cross threads one at a time.  The plaid made it
easy to keep the hem straight.


I am especially proud of the plaid matching. I didn't worry too much about the vertical matching - just got the horizontal part to work.
Double pinned to match plaids


Since it is a loose weave I was worried about it shifting so I double-pinned it.


All accessorized and ready for winter!


I'm feeling good that I got one winter sewing project done.  Now if we still have power tomorrow....

Oh the possibilities!!!


If you are in Sandy's path, stay safe and dry!


Monday, October 22, 2012

Quick Indian Curry "Cheater" Dinner

I have pledged to get at least 7 hours of sleep a night this week.  This means that I have to be sleeping by 10:00.  Not an easy feat for a night owl like me!  Last night was day one of this plan - 10:45pm found me still puttering around "getting things done."

So how to fit in work, workout, dinner and lunch packing and still make it to bed by 10:00?  Plan A:  easy meals this week.

Today's easy meal was brought to you by the last of the garden veggies and a yummy Indian simmer sauce from Whole Foods.

The simmer sauce that made it happen tonight!


This sauce is great!  You just sauté your favorite meat and veggie and add in the sauce...and it's only 70 calories and 2 grams of fat per serving.  It did have a fair amount of sodium, but if you balance it with lower salt the rest of the day/meal, it shouldn't take you overboard.

I added in the last of the japanese eggplant and red peppers from the garden.  I added some sautéd chicken tenders and some chickpeas.  


Chicken and Eggplant Curry with Chickpeas


Stirred it up, let it simmer and...Whaa La!  Dinner is ready in under 30 minutes - Just about enough time for the jasmine rice to cook up in the rice maker.  

It was delicious!  As good as many curries we've had at Indian restaurants.  Bonus - it is a one-dish-wonder!

So here's the more-or-less recipe.  Be creative with your version - This is definitely one of those add-whatever-you-have dishes!

Chicken and Eggplant Curry with Chickpeas
1 pound chicken tenders cut into bite-sized pieces
1 red peppers cut into chunks
4 - 5 cups japanese eggplant, cut into 1 inch cubes
1 can chickpeas, rinsed
Olive Oil
1 jar Bombay Curry Simmer Sauce
Jasmine Rice, cooked
Cilantro, chopped (optional)

1.  Saute chicken tender pieces in 2 tsp olive oil until golden brown and cooked through.  Remove from pan and keep warm.
2.  Add peppers to saute pan and cook until barely crisp tender.  Remove from pan.
3. Add an additional  2 tsp olive oil to pan and add eggplant.  Cook eggplant, stirring frequently until it begins to soften.
4.  Add chicken and peppers to the eggplant in the pan and pour one jar of simmer sauce over the mixture.  Fill the sauce jar 1/2 full of water and add the water to the pan.  
5.  Simmer for 5 minutes on low, stirring occasionally.
6.  Add chickpeas and simmer and additional 10 - 15 minutes (it only gets better as it simmers!)
7.  Serve over jasmine rice.
8.  If you like cilantro, it would be yummy to sprinkle a bit over the top - maybe with a dollop of plain yogurt.  


Enjoy your quick meal....As for me...I'm already running behind on day 2 of my 7-hour sleep plan.  Better get moving!

Quick or slow - Enjoy your feasts this week!


Tuesday, October 16, 2012

Just a Little Haiku for Today

There has been no time lately for feasts or fabrics...typical for this point in the school year!  So I thought I would put up a quick post about something else close to my heart - My good old faithful 12-year old pup!  


faithful old dog
slow walk through crisp 
 leaves
golden moments


My old boy used to be my best walking companion - eagerly completing 4-5 miles with me.  I used to joke that I should have named him PT for personal trainer because even if I didn't feel like walking on a particular day, he knew that it was walk time and would nudge me toward our daily walk like only a golden retriever can.  


He is old now and was diagnosed with lymphoma last September (We are so lucky that he is still here!) so walks are not quite the pace they used to be - more a slow wander.  Although I am still an avid fast-paced 4-5 miler most days, Jake has taught me the joy of slowing down sometimes and just ambling along.  
Always smiling!
 

Our amble today was the perfect antidote to a busy day at school. 

What better way to spend an crisp autumn afternoon than a slow stroll with a faithful old friend?


Saturday, October 6, 2012

Chocolate Hazelnut Banana Bread - Dessert on a Weeknight!

I had a little hankering for something sweet this week and when I opened up my latest Cooking Light Magazine it magically opened right to Chocolate Hazelnut Banana Bread.  It was meant to be!  Although I'm pretty sure that light is a relative term with this banana bread, it was totally delicious and worth every extra crunch and mountain climber I had to do to make up for it!

Chocolate Hazelnut Banana Bread
At first glance the recipe seemed to have a lot of steps, but it actually came together pretty quickly - a must for a weeknight treat!

Chocolate Hazelnut Banana Bread
5 Tbsp Nutella (See- Already delish!)
3 Tbsp plus 1 tsp canola oil, divided
3 Tbsp butter, softened
1/2 cup packed brown butter
2 medium ripe bananas, sliced
2 large eggs
6.75 ounces all purpose flour (about 1 1/2 cups)
3/4 tsp baking soda
1/2 tsp baking powder
1/2 tsp salt
2/3 cup whole buttermilk (I used low fat cuz that's what they had at the store)
Baking spray with flour
1/4 cup hazelnuts, coarsely chopped
1 oz bittersweet chocolate, finely chopped

1.  Preheat oven to 350
2.  Combine chocolate-hazelnut spread and 1 tsp oil in a microwave-safe dish; microwave at HIGH for 30 sec. or until melted.  Stir.  Combine 3 Tbsp. oil, butter, brown sugar, and banana in a large bowl; beat with a mixer at medium-high speed until well blended.  Add eggs, 1 at a time, beating well after each addition.
3.  Weigh or lightly spoon flour into dry measuring cups; level with a knife. Combine flour, baking soda, baking powder, and salt.  Beating at low speed, add flour mixture and buttermilk alternately to banana mixture; beat just until combined. 


4.  Scrape half of batter into a 9 x 5 inch metal loaf pan coated with baking spray


5.  Top with chocolate hazelnut spread mixture.   


6.  Spread remaining batter over chocolate mixture.  Using a pick, swirl batter. 


7.  Sprinkle batter with hazelnuts.  Bake at 350 degrees for 55 minutes or until a wooden pick comes out with moist crumbs clinging.  Cool 10 minutes in a pan on a wire rack. Remove bread and cool on a wire rack.  


8. Place bittersweet chocolate in microwave-safe dish; microwave at high for 30 seconds.  Drizzle bread with chocolate; let stand until set.  
Look at that delicious swirl of hazelnut spread in the banana bread - mmmm  mmm!
It smells so delicious that you might be tempted to cut into it while it is still hot, but it really does slice and taste better if you wait 'til it cools down a bit.  (You can do it!  Well, maybe you can - because obviously I couldn't.  That's how I know its better cooled a bit.   :-) 

I hope you had a little "sweetness" in your life this week!


Wednesday, September 26, 2012

Roasted Chili Verde with Pork and Rice

 Roasted Chili Verde with Pork and Rice was on the menu for Monday night and it was delicious! It was from my fave Cooking Light this month (Oct 2012)
Roasted Chili Verde with Pork and Rice


I rushed home from work to get it going because, although the actual hands-on time for this dish is not too bad, but takes a bit of planning to pull it off because it has to cook for at least an hour to make sure that the pork gets nice and tender.  The pay-off is so worth it!  


The first step was to peel the papery covering off and roast some tomatillos.


Aren't these cool?  They have kind of a sticky film underneath the husk.


Getting tomatillos ready for the oven
After broiling for 15 minutes


The raw ingredients for the salsa


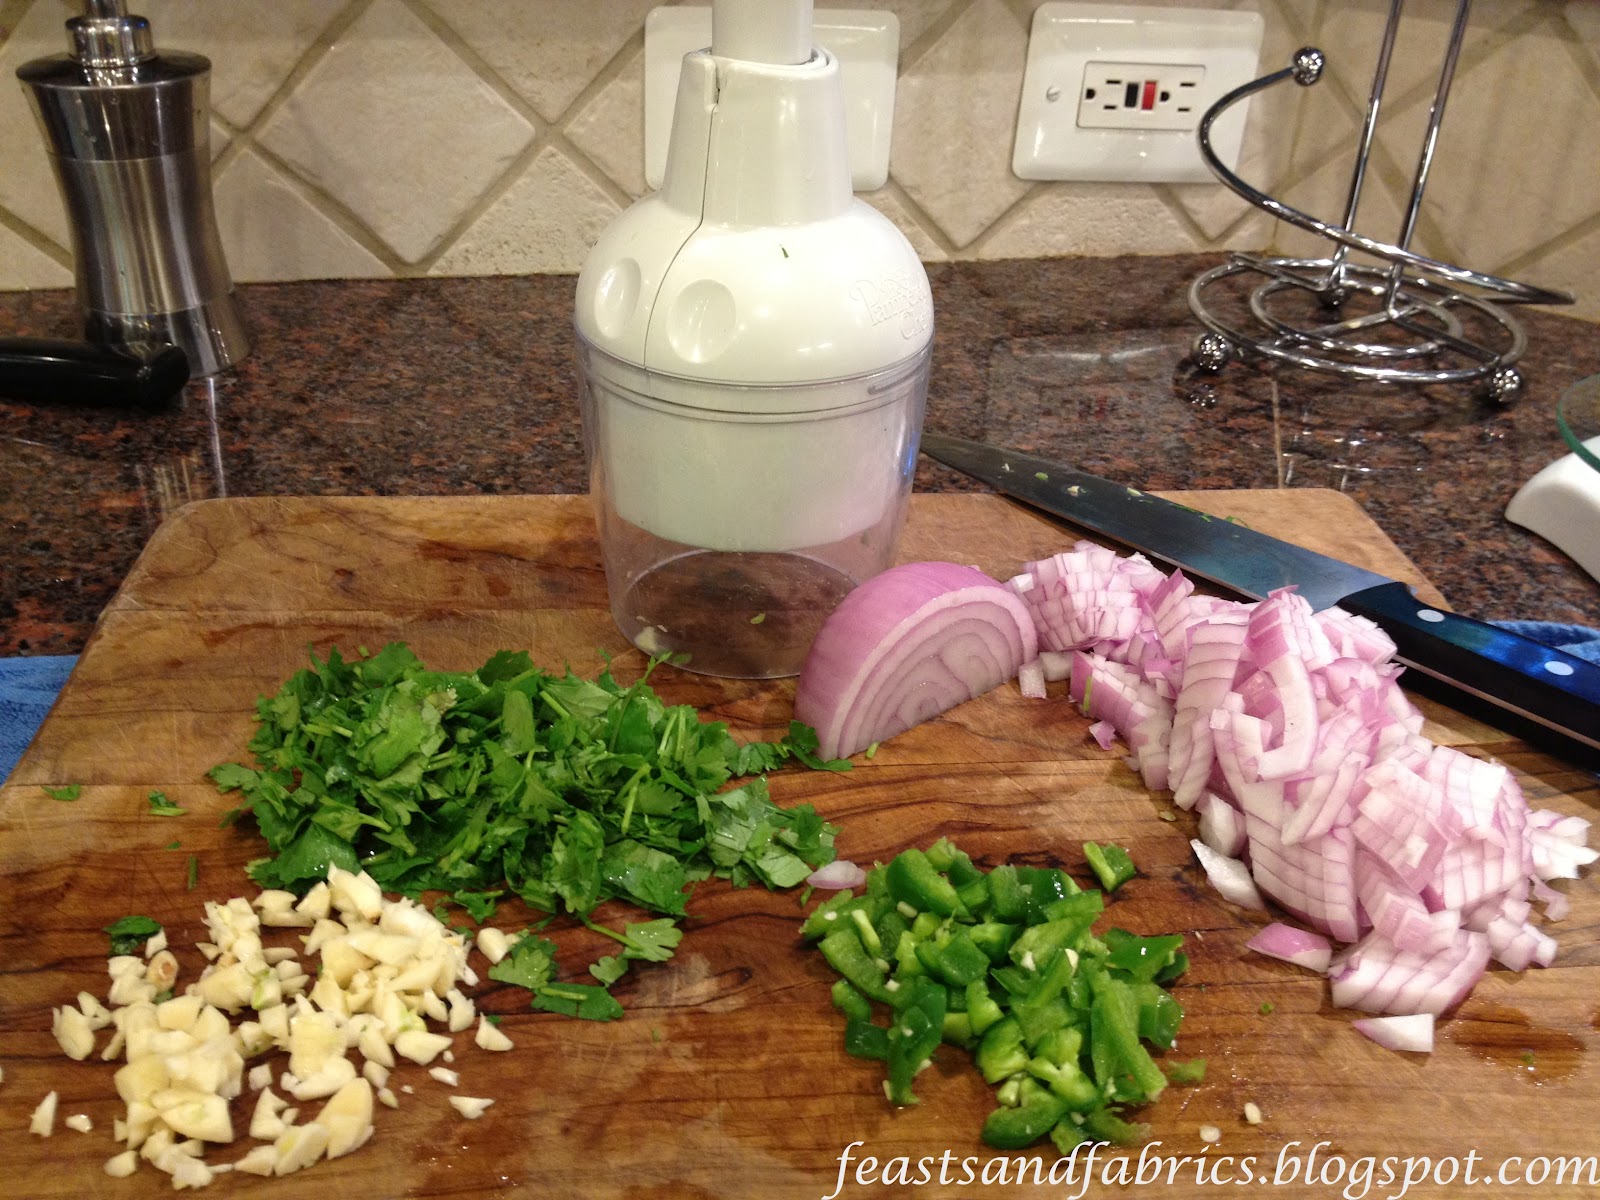
After you roast the tomatillos, you take them for a spin in the food processor with some onion, sugar, garlic and jalapeño pepper.


This is the point where you wish this blog had smell-a-vision!  It smelled A-MAZ-ING!


While the tomatillos are broiling, I was browning some cubes of boneless pork shoulder.  And then it all went together into a pot to simmer for an hour or until the pork is fork tender. 

Now you have a pocket of time to run downstairs for a quick workout so that you have calories left to eat this deliciousness.  (Yes - I actually did do this!)

With about 20 minutes left in the pork cooking time, you throw some onion and rice in a pan with a touch of oil.  Add a can of mild chili-flavored tomatoes and some water and let it simmer by itself.  Plate it up... and...

Deeeelicious!  


I served it up with a simple salad of navel oranges and avocados.


My only regret...I should have made a double batch and frozen some for later! Oh well, next time - and there will be a next time!

Roasted Chili Verde with Pork and Rice
1 1/2 pounds tomatillos, husks and stems removed
1 cup chopped onion, divided
1/4 cup chopped fresh cilantro leaves
1 tsp sugar
2 garlic cloves, chopped
1 jalapeño pepper, chopped
2 Tbsp canola oil, divided
1 poud boneless pork shoulder (Boston butt), trimmed and cut into 1 inch pieces
1/2 tsp kosher salt, divided
1/4 tsp freshly ground black pepper
1 cup uncooked long-grain rice
1 (10 ounce) can mild diced tomatoes and green chiles, undrained
1 cup water
1 jalapeño pepper, sliced (optional)
Cilantro leaves (optional)

1.  Preheat broiler to high.

2.  Place tomatillos on a baking sheet or jelly-roll pan coated with cooking spray.  Broil 8 inches from broiler for 15 minutes or until skins blacken and tomatillos are soft.

3.  Place tomatillos, pan juices, 3/4 cup onion, and next 4 ingredients (through chopped jalapeño) in a blender or a food processor; process until sauce is almost smooth.

4.  Heat a Dutch oven over med-high heat.  Add 1 Tbsp oil to pan; swirl to coat.  Sprinkle pork evenly with 1/4 tsp salt and black pepper (I forgot this step so I threw it into the pan as the pork was sautéing - oops!)  Add pork to pan.  Sauté 6 minutes, turning to brown on all sides, Add tomatillo mixture to pan; bring to a boil.  Cover, reduce heat, and simmer 1 hour or until pork is very tender, stirring occasionally (It took mine about an hour and 20 minutes - I like it very tender.)

5.  Heat a large saucepan over medium-high heat.  Add remaining 1/4 cup onion; saute 2 minutes or until soft.  Add rice; sauté 3 minutes, stirring frequently.  Add remaining 1/4 tsp salt, tomatoes, and 1 cup water to pan; bring to a boil.  Cover and simmer 15 minutes or until liquid evaporates and rice is tender; do not stir. (Shhh...Don't tell...I stirred.)  Divide rice among 4 plates.  Top with pork mixture; garnish with sliced jalapeño and cilantro leaves, if desired.  


Sunday, September 23, 2012

The "easy" little knit top that took all day...

I finished the knit top that I started yesterday and I'm happy with the result, but it wasn't quite as easy as I had hoped.  


Me sporting my new Butterick 5493 knit shell


The top is only three pieces and I tweaked the fit on Donna the Dressform yesterday so all seemed to be fine. I decided yesterday to be a rule-breaker - Soo not me! - and cut the pattern on the cross grain because there is a bit of a directional pattern to this print and I wanted it running up and down not around and around my curvy figure.  


Butterick 5493


The fabric was equally stretchy in either direction so I didn't have any problems. 

The pattern directions were basically good - I mean there were only 3 pieces! There was one place where they referred to a large dot and there was no large dot on the pattern, but it was easy to figure out where you needed to stop stitching. 


See how the arm holes don't gap at all!  Finally!


All went well until I got to binding the armholes.  They were gapping on the sides, so I took the sides in about a half an inch right at the arm hole and solved that problem.  When I put on the binding, however, the fabric was so stretchy that I ended up with a baggie mess!  So after several attempts (including sewing to the wrong side of the fabric - TWICE!), I was able to ease the fabric to the binding and ended up with a nice, not gap-y, no bra-showing armhole.  Happy!


I think that I will make this top again with one of the other neckline options, but I will make it a bit longer and will raise the neckline some.  It might be a little too showy for my 9th grade Bio students!  :-)


I think I'll try view C next.
With fall weather in full swing, I will probably wear it more as a layering piece - like this:  
Perfect for layering!
So even though it was a bit frustrating, I think I learn a lot about how to deal with bound knit armholes...Has anyone out there got any other solutions to make sure that the fabric doesn't stretch and there is no gap-osis?


I hope that the weather is as beautiful where you are as it is here!  


Love,
Pam